Thursday, 2 April 2015

Friday, 27 March 2015
Tuesday, 24 March 2015
Tuesday, 17 March 2015
Thursday, 12 March 2015
How I have Evolved My Idea

At the start of planning my firsts step was to decide what genre I wanted to use. I eventually chose Comedy and made a mind map laying out all the generic features of comedy to try and stimulate some ideas.
I then came to the decision to make and action comedy and started to write down what ever came in my mind just to get some ideas flowing and I can develop it from there.

Next I made a storyboard so I can visualise my idea and this will help when I wanted to write my script.


After I Had written my script I made a few changes in the next couple of days. These included,
- Stanley will no longer have any lines apart from Hi... and then he gets interrupted by ken.
- There will be more screen time of Hugo getting dressed and panicking before Stanley comes in
Also instead of it being a phone call to ken it will now be face time. The camera will focus on Hugo's phone displaying ken on it. It will then zoom into the phone and will transform as if you are looking at ken from his phones point of view. it then will vary from Hugo's house to Hugo's phone to ken afterwards.
A few days later I had made some more changes regarding the script
- The script changes make Stanley and ken fight instead of talk
- there is a new long shot added in to show the argument on a large scale and to emphasis how stupid they are.
I made these changes as I thought that it would show the audience how much ken really does change in the rest of the film. I did this because when ken becomes friends with Stanley the audience can now look back on this and compare it to then and really see how far ken has came in his journey for finding who he really is on the island.
Then I drew a new storyboard as I was happy with my idea and I can use it to help me film.

During filming me and my cast decided to add a few more shots in, take some out and change some of the lines.
I chose to do this as when I was there in the flesh ready to film some of the shots and lines just didn't seem believable so I changed them. For example I added a new shot of Hugo picking up keys and turning on the radio.
I also made quite a large change by removing Hugo's mother from the film and changed it so the audience doesn't know that Hugo is skipping school. I did this because I think by slowly revealing that Hugo is a rebel character it provides me with the tools so I can create an element of surprise later on in the film.
Monday, 9 March 2015
Thursday, 5 March 2015
Sunday, 1 March 2015
Who would be the audience of your media product?
Who would
be the audience of your media product?
I believe that my audience
mainly consists of 14-21 year olds from both sets of genders. This is because
most of my characters are also in that age group. When thinking of the film I
really wanted to emphasise on the relate ability of the characters to current
teens of that age. After looking at current forms of media such as The
Inbertweeners and Miss-fits and seeing their success with realistic and
relatable characters I wanted to include it in my film.
After conducting some
audience research to find out what age group, gender and race the comments that
really stood out were the age. I received a even response between males and
females and people of different cultures.
This would then help me to develop the film around that audiences such
as the type of comedy to have because after all my film is an action comedy. And also older
age groups tend to prefer more psychological action and mystery. Where’s the
younger ages prefer explosions, guns and fast cars etc.
The rest of my audience will
be people who enjoy comedy and action. The beauty of this is that everyone and
anyone could have these preferences. So not only can there be more people
wanting to watch the film but these random people can bring friends and family
to come along too.
But back to my main
audience, 14-21 year olds. These age groups will be enjoying the film more than
older people because they live the same lifestyle as the main characters. And
back to that word again “relateability” I believe that this will emphasis the
comedy effects on the audience because they will all know “that one clumsy person”,
“the stupid person” and “the bossy one” this is just what I want because when
they see it on the screen they can relate to it in real life too. And that’s the
beauty of having this type of film.
Saturday, 28 February 2015
Preliminary task
This is our Preliminary task:
"Continuity task involving filming and editing a character opening a door, crossing a room and sitting down in a chair opposite another character, with whom he/she exchanges a couple of lines of dialogue. This task should demonstrate match on action, shot/reverse shot and the 180 degree rule.
I worked in a group with Phil, Harriett and Kayla to complete this. We decided on the idea of a strange man purchasing a keyboard in a music shop.
This was our first real opportunity to use the cameras to film and then the editing software in post-production.

Below is the finished product..
"Continuity task involving filming and editing a character opening a door, crossing a room and sitting down in a chair opposite another character, with whom he/she exchanges a couple of lines of dialogue. This task should demonstrate match on action, shot/reverse shot and the 180 degree rule.
I worked in a group with Phil, Harriett and Kayla to complete this. We decided on the idea of a strange man purchasing a keyboard in a music shop.
This was our first real opportunity to use the cameras to film and then the editing software in post-production.
Below is the finished product..
Wednesday, 18 February 2015
Wednesday, 28 January 2015
Research into freeze fram credit titles
I got some inspiration for my film titles from the film train spotting. They use the freeze frame effect vey well and while watching it I felt like it would be something that I should incorporate in my film.
Here is the film trainspotting:
Here is the film trainspotting:
Saturday, 24 January 2015
Thursday, 22 January 2015
HUGO Advertisement Poster
This is my advertising poster for my film, HUGO.
Please note that the reviews aren't official but in my opinion very accurate!

Please note that the reviews aren't official but in my opinion very accurate!
How I have made my Video (Audio)
This is how I made the audio of my film allot better and at a higher quality.
The DOR that I used was Logic ProX. I used this as I am very familiar with it as I use it at school in my music technology lessons. So this task wasn't to strenuous for me as I knew how everything worked and where everything was.
The first step in editing the audio was to extract all the audio from the video. After that I then imported it all into Logic. Next I split the clips up for all the different surroundings e.g. Outdoor, bedroom, kitchen etc... After that I could now EQ the Audio tracks.
EQ
 |
| EQ modulator |
For the EQ I used the analyser to show where the main body of the frequency's sat. I then did a Filter sweep to find any outlying frequency's that I needed to cut out. This would make the sound allot clearer and tighter. I then did a brick wall to the low frequency's to remove allot of the muddy sounds that I didn't need and finally a high cut to make the audio sound les 'trashy'.
Compressing
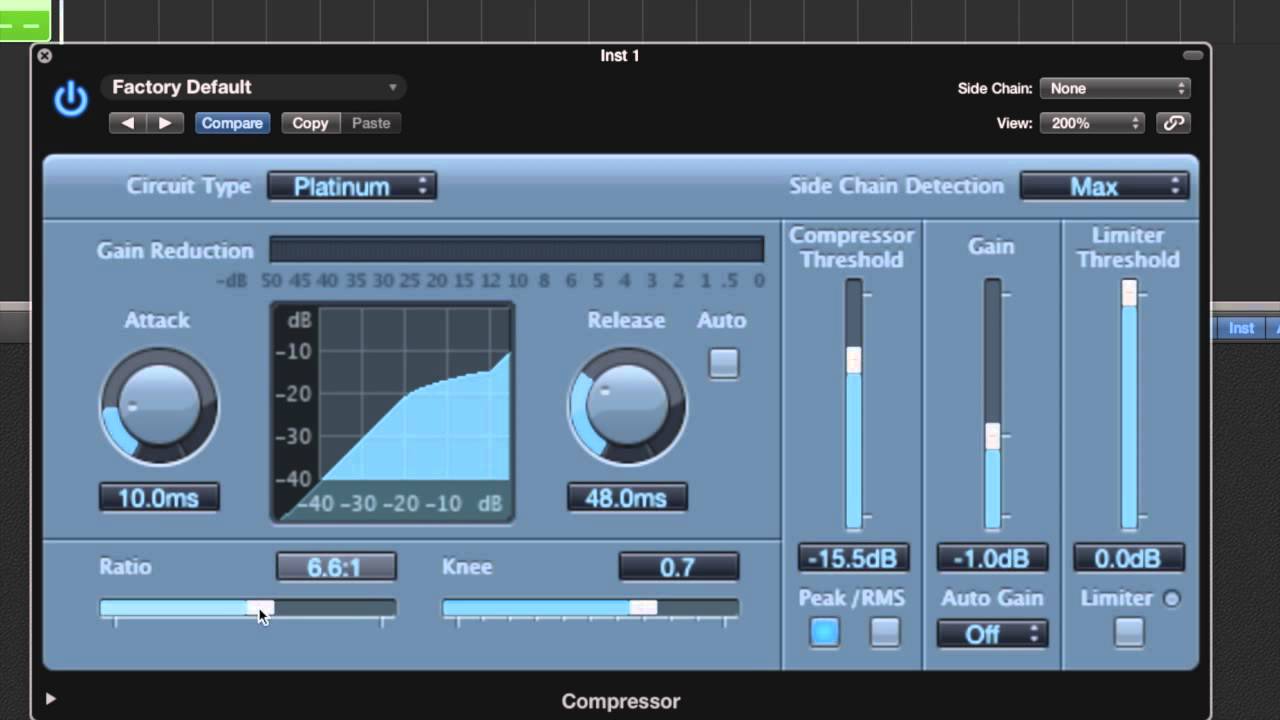
For the compression I Reduced the compressor threshold so that the dynamic range is reduced. This would allow me to normalize the track to make the audio sound more stable and clearer to hear. I increases the ratio for the same reasons and decreased the attack and release as this is a compression for speech not music.

Limiter
Finally I added an adaptive limiter so I am able to increase the gain but make sure the track doesn't clip over 0.0. db.
Here is what my finished mixer looked like:

Then I finally exported the track and mastered it. Then replaced the old audio with the new one.
I didn't do anything to the music in my track as it has already been mastered so there was no need for me to edit it.
Character profile: Stanley
 This is Stanley, one of the less intelligent specimens on this planet. But he always somehow works his way in your heart. Oh who am I kidding... he is an absolute dork! Stanley is that kid that sits on his own at lunch, he's the one whose picked last in P.E, he's the kid who manages to get super powers from the island and save the day by killing the bad guys.
oh that last bit? yea that happens but don't worry ill explain.
The way I came up with the character Stanley is that I needed someone to be the hero in my film. And it was just too boring if it was someone else as it would be too predictable. So I need to make an underdog. And who doesn't like routing for an underdog in films? So Stanley was perfect. I decided it will be him who secretly discovers the islands powers and is a complete badass with these powers. Although, his stupidity can make for an interesting light show...


Monday, 19 January 2015
Why the delay?
the reason behind me not uploading my finished video yet is not because I'm slacking, its because I haven't had any internet at home for the last 3 days. Hopefully it will be back on tonight so I can upload it and show it to everyone.
Sorry for the delay :)
Sorry for the delay :)
Friday, 16 January 2015
What I have left to do...
As of today I still need to:
- Show how my idea has evolved DONE!
- audience research DONE!
- How I made my video DONE!
- finish recording and editing the video DONE!
- Stanley's character profile DONE!
- Viewers reaction and comments to video
Wednesday, 14 January 2015
How I made my film opening animation (coursework)
To make my small animation I used adobe after effects CC and this did take a while to get to grips with but in this post I'll be showing you exactly how I managed to get my text animation completed.
Step 1)
First things first you want to open up the 'animation workspace' and then you want to create a new composition. After that your screen should look like this:

step 2)
Next you will need to create the piece of text you want to animate. You should then get a Text interface open up on the right


Step 1)
First things first you want to open up the 'animation workspace' and then you want to create a new composition. After that your screen should look like this:
step 2)
Next you will need to create the piece of text you want to animate. You should then get a Text interface open up on the right
Step 3)
Now right-click on the text and select Animate text and then what ever type of animation you would like. In this instance I used position but you can choose what ever you like.
Step 4)
Now you want to click on the little clock located to the left of the type of the animation you are doing. But first position your text where you want the animation to start from. You should then get a little yellow diamond appear in your timeline. This is the point where the animation will start from. you can move it by clicking and dragging it along.
Step 5) Now finally move your timeline cursor to where you want the animation to finish at. Then go back to the animation controls and move them to what you want the animation to finish as. Again a small yellow diamond will appear and that will signal the end of the animation.
And there you have it! just export it and your done. maybe try adding some pictures or multiple
effects or some music to make it seem very professional.
My Magazine Review
I decided to make a 2 page spread review of Dawn of the planet of the apes because I had some free time. Here it is!

Thursday, 8 January 2015
To do list for film day.
List of things needed to be recorded on film day,
At the house:
At the house:
- Zooming Shot of the house.
- Alarm sound.
- all of Hugo shots in house
- shots of the door.
- the zoom into the phone.
- pictures during recording
- Vlog
- Target audience
- screenshot the face time buttons
- Pictures of the recording process
- Vlog
- walking along river shot (selfie)
- Bench shots
- Stanley steal the camera shot
- across the river shot
- video on ipad of ken selfie (not essential) as it can be mapped in.
Subscribe to:
Posts (Atom)